advertisement

Raspberry Pi Tank Kit: Assembly & Installation on Ubuntu Server 20.04
When you build a robot, there are basically two approaches: you can start from scratch, get all the necessary hardware (the chassis, sensor, actuators, and microcontroller or single-board computers), and program the software. Or purchase a complete kit that includes all the parts and a software stack.
In 2021, I started a project to build a pickup and delivery robot with automatic navigation. I created two robots from scratch. RADU MK1 is based on Arduino and is controlled via IR. RADU MK2 is a combination of Raspberry Pi and Raspberry Pico, it runs ROS and accepts motion commands through this robotic middleware. The construction of a moving robot, although not autonomously navigating, seemed complete.
Then, to boost my knowledge and skills on robotic arms, I tried out a complete robotic arm kit. Once assembled, I wrote a Python script that directly executes the move options. It was a pleasant surprise and I considered other robotics kits. How about choosing a kit for a mobile robot that has a manipulator on top?
This article introduces the Raspberry Pi Tank kit and how I rewrote the basic software to make it work on an Ubuntu Server 20.04 operating system. You will learn about necessary patches, autostart, and interface modification.
This article originally appeared on my blog admantium.com.
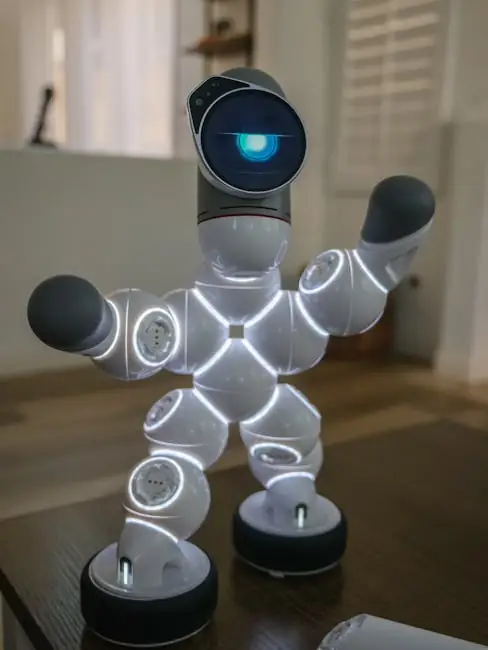
RaspTank Robotic Kit
The Raspberry Pi Tank comes as a complete kit with all parts, build tools and software. It moves on two rails, has a distance sensor and a Raspberry Pi camera mounted on the front. Additionally, it has a 3 DOF gripper that can interact with objects directly in front of the tank. This kit is the second from the same company, because I had good experiences with the manipulator robot as explained in a previous article.
Once assembled and configured, the tank can be operated from an intuitive web GUI from any computer connected on the same network. However, in my robot project, I want to use the ROS robot operating system to control it. And here it became difficult. The robot control software is designed for the Raspberry Pi operating system. But getting ROS running means compiling everything from scratch. Therefore, I switched to Ubuntu Server 20.04 where ROS runs without problems, but now the robot control software was not working without additional configurations.
Part 1: Assembly
Assembling this robot was not as challenging as my experience with the moving gripper. Of course, this takes into account the point at which I gained experience. The positive point I want to mention is that the manual tells you very early on to connect all the servo motors for an initial calibration. The robot software starts briefly, rotates all servomotors to their natural 90-degree orientation, and shuts down. You can then continue assembly with all the servomotors correctly oriented, completely eliminating the tedious disassembly of the arm joints that you had with the robotic arm model.
Keeping the camera in mind, make sure to run the camera cable through the shield, then attach the camera cable to the Raspberry Pi, and then attach the motor shield to the Raspberry Pi.
Part 2: Installing the necessary libraries
Following the installation manual, you basically copy the official source code, run a configuration script, and then start a local web server that opens a web interface to control the robot. But because we switched from Raspberry Pi OS to Ubuntu Server, this initial startup doesn't work. Specifically, I encountered the following errors
./home.sh
Trace (most recent last call):
File "//home/pi/adeept_rasptank/server/webServer.py", line 26, in
import application
File "/home/pi/adeept_rasptank/server/app.py", line 8, in
from camera_opencv import camera
File "/home/pi/adeept_rasptank/server/camera_opencv.py", line 2, in
import cv2
File "/usr/local/lib/python3
advertisement
Related Articles


advertisement