advertisement
RADU: Controlling Robot Movements with a Gamepad Controller using Python
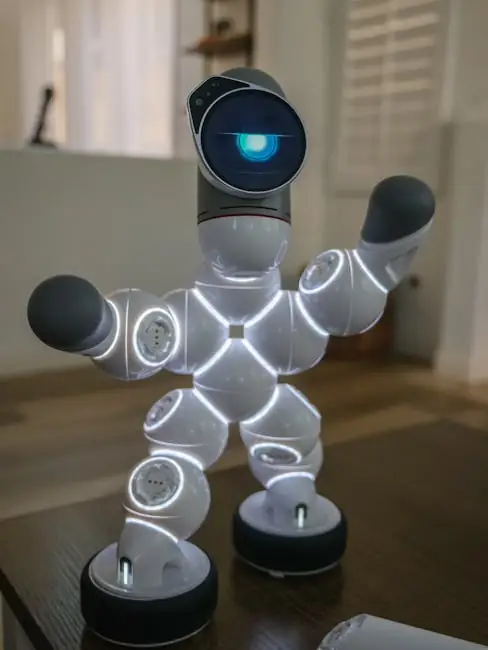
My RADU robot is a two-wheeled robot that combines custom sensor and motor hardware, a Raspberry Pico and L293D motor shield, and a purchasable robotic arm that is controlled by a Raspberry Pi shield. For both parts of the robot, I want to use the same mechanism and control device: a game controller. To achieve this goal, the last article provided an overview of the different libraries. This article is a tutorial on how to write driver software. You will learn how to use the Piborg Gamepad Python library and link button presses or the joystick to control the movements of the robot's wheel and its arm.
This article originally appeared on my blog admantium.com.
The game library
My gamepad library of choice is Piborg Gamepad. This versatile Python library provides a simple abstraction for connecting custom mapped gamepads, with a slight focus on video game consoles. It can detect the status of all buttons and axis, e.g. on a PlayStation pad that includes the d-pad and analog stick. And it provides different programming models on how to access the gamepad state, e.g. with event listeners that trigger callbacks or a continuous loop that gets the state of all the buttons.
After a short period of time just to press a button and move the robot, I decided to use this library to fully program my robot. Let's start with the simple outline.
Button Settings
The first part is to import the library and configuration variables for the buttons of the chosen gamepad. To do this, refer to the gamepad settings and take the defined button names from this file for your specific gamepad. Then translate them into meaningful names. Here is my mapping to access the joystick, digital pad and some buttons:
import lib.Gamepad as Gamepad
# Game settings
gamepadType = Gamepad.PS4
# Axis
joystickSpeed = 'LEFT-Y'
joystickDirection = 'RIGHT-X'
digital_x = 'DPAD-X'
digital_y = 'DPAD-Y'
# Button
button_ps = 'PS'
button_triangle = "TRIANGLE"
Controller connection
With the button configuration complete, we will now wait to write a method that waits for a gamepad to connect. Once this condition is met, we will create a command object that will be instantiated with the configuration. This code looks like this:
def wait_for_gamepad():
# Wait for a connection
if not Gamepad.available():
log_to_stdout_and_mqtt('Please connect your gamepad...')
as long as it's not Gamepad.available():
time.sleep(1.0)
gamepad = gamepadtype()
return command
Control button press detection
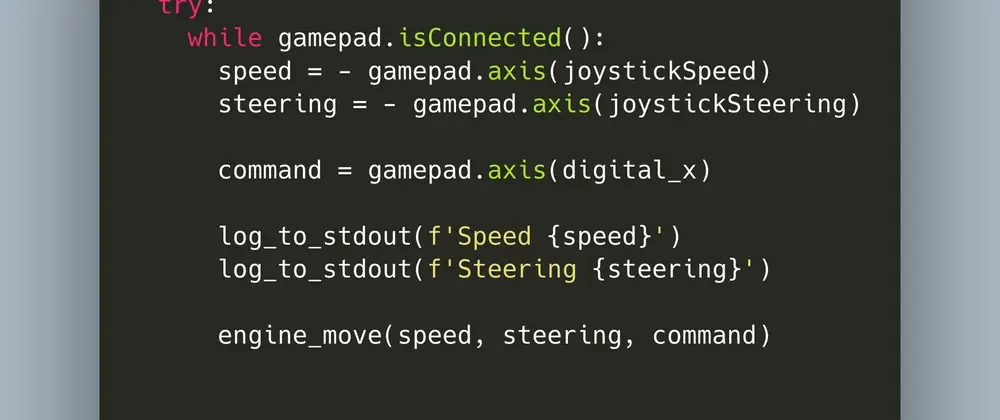
The next step is to start the main loop of the program which will continuously check the status of the button. I decided to use a simple loop that continuously polls the buttons and executes some commands. Let's start easy and define a listener for the buttons.
def main_loop(game controller)
survey interval = 0.01
gamepad.startBackgroundUpdates()
test:
while gamepad.isConnected():
if gamepad.beenPressed(button_triangle):
log_to_stdout("Triangular button is pressed")
# Sleep during our voting interval
time.sleep (survey interval)
finally:
# Make sure the background thread always ends when we're done
gamepad.disconnect()
This method does a couple of things:
- The
survey interval
determines how often per second the button states will be checked - The entire button detection logic is enclosed in a
try... catch
lock, mainly as a safety measure to release the gamepad if something goes wrong - alternatively, you can define a custom context manager to handle the setup and teardown phases - The state of the gamepad buttons is checked against the
pressedstate()
method, which gets an argument from the button layout defined above. As shown here, you can use if
statements to check their state and then execute some command: at the end of the loop, a
sleep
The command is issued with the defined poll interval.
Ok, now let's see how to check the d-pa.
advertisement
Related Articles


advertisement